


Trophy Guide Preview
Overall Trophy Progress
0 / 44 Completed
0%
Trophy Types
Platinum
0 / 1Gold
0 / 3Silver
0 / 12Bronze
0 / 28Categories
Missable
0 / 11Collectible
0 / 2Grind
0 / 4Ending
0 / 7Misc
0 / 4Story
0 / 15

Return to the fog-covered town of Silent Hill as James Sunderland, searching for answers after receiving a letter from his deceased wife. Explore unsettling locations, solve puzzles, survive grotesque creatures, and uncover a psychological horror story filled with grief, guilt, and disturbing secrets.
Overall Trophy Progress
0 / 44 Completed
0%
Platinum Path
EARLY GAME Silent Hill 2 Remake is best experienced blind the first time, but if you want the most efficient Platinum route, this first playthrough should also be your big collectible and combat run. The game has multiple points of no return, and most collectible sets need to be completed within a single playthrough, so make sure you thoroughly clear each area before moving on. Use Light Combat and Light Puzzle diffi...
Completion Video Playlist
1 video
Silent Hill 2 Remake Platinum Trophy Guide 00 / Preview
Trophy: You Made Me Happy
Collect all other trophies in the game.
Type: Platinum
Unlock Details
Collect all other trophies in the game.

Trophy: All Seems in Order
Discover the secret of Room 106.
Type: Bronze
Category: Missable
Unlock Details
Discover the secret hidden inside Room 106 at Jacks Inn. You can first enter Room 106 while traveling with Maria, but the trophy will not unlock during that initial visit. After finishing Brookhaven Hospital and returning to South Vale (West), make your way back to Jacks Inn before continuing toward the Silent Hill Historical Society. Enter Room 106 again, walk to the foot of the bed on the right, and interact with the symbol on the wall when the prompt appears. The trophy will unlock immediately.
Tip
Make sure you do this before leaving the area for the Historical Society. Room 106 is easy to forget once the story starts pulling you forward again. This room is also a neat Silent Hill 3 callback, so it is worth stopping by even if you are not hunting trophies.

Trophy: As Close as You Like
Finish the game without killing enemies using ranged weapons.
Type: Gold
Category: Missable
Unlock Details
Complete the game without killing any enemies with ranged weapons. The Handgun, Shotgun, and Rifle all count as ranged weapons. You are allowed to fire them, but the final blow that kills an enemy cannot come from a gun. That means you can still use firearms to weaken enemies if needed, then finish them with melee. There is also one required shot in Lakeview Hotel to knock down a key item from a glass roof, and that does not interfere with the trophy. The easiest way to do this is in New Game+ using the Chainsaw. On Light difficulty, it can kill most normal enemies very quickly and makes boss fights much easier as well. Keep dodging, close the distance, and finish everything with melee.
Tip
This combines very well with Radio Silence during a New Game+ run. With the Chainsaw, both trophies become much easier to manage.
Warning
Be careful when using guns to stagger enemies. If the final bullet kills one by accident, the run is ruined for this trophy.
Video Guide: https://www.youtube.com/watch?v=JCPXdTA42CA

Trophy: Faster Than Fog
Finish the game in under 10 hours.
Type: Silver
Category: Missable
Unlock Details
Finish the game in under 10 hours. This is much easier once you already know the game, so it is best saved for a later playthrough or New Game+ run. Set both Action and Puzzle difficulty to Light to make combat and puzzle sections faster. Skip cutscenes whenever possible by holding Square. Stick to the main route and avoid unnecessary exploration, collectibles, and optional rooms. Knowing where key items are located saves a huge amount of time. You also do not need to fight every enemy. Dodge past anything that is not blocking your path and save your stronger weapons for bosses or unavoidable encounters. For normal enemies, a quick Handgun shot to the legs can create enough of an opening to run past them without wasting time on a full fight. If you are doing this in New Game+, the Chainsaw is especially useful for quickly dealing with enemies that cannot be avoided. Use known puzzle solutions instead of solving everything from scratch, and save regularly so a death does not cost you a large chunk of progress. Most importantly, the timer stops while the game is paused. If you need to check a route, puzzle solution, or simply figure out where James is supposed to wander next, pause first and take your time.
Tip
The 10-hour limit is fairly generous once you know the route. Focus on progression instead of trying to play perfectly, and you should have plenty of breathing room.
Warning
Avoid combining this with a heavy collectible run unless you are very comfortable with the game. Every optional detour adds time, and Silent Hill has no shortage of tempting side rooms.
Video Guide: https://www.youtube.com/watch?v=I_5BuU6Rjds

Trophy: It's Bread
Interact with bread.
Type: Bronze
Category: Missable
Unlock Details
Interact with the bread in the Employee Section of Lakeview Hotel. Later in the hotel, you will use an elevator to reach the Employee Section. This area temporarily takes away your equipment, including your flashlight and weapons, so navigation is a little more uncomfortable than usual. Make your way to the Break Room first and grab the map. From there, head southwest through the Cafeteria and continue into the Kitchen. In the northern part of the Kitchen, look for the baking trays and interact with the bread to unlock the trophy.
Tip
This is a direct nod to Silent Hill 3’s famous “It’s bread” moment. Sometimes the most important thing in a nightmare town is simply confirming that, yes, the bread is still bread.
Warning
Make sure you interact with it before leaving the Employee Section, since this is easy to walk past while you are focused on getting your gear back.
Video Guide: https://www.youtube.com/watch?v=HOcD1Ll4AU0

Trophy: James of All Trades
Kill at least one enemy with Wooden Plank, Steel Pipe, Handgun, Shotgun and Rifle in a single playthrough.
Type: Silver
Category: Missable
Unlock Details
Kill at least one enemy with each of these five weapons during the same playthrough: Wooden Plank Handgun Steel Pipe Shotgun Rifle You do not need the Chainsaw for this trophy. Wooden Plank Location: South Vale (East) You obtain this automatically near your first enemy encounter, shortly after crawling through the broken garage door and picking up the Radio. Handgun Location: Wood Side Apartments Head to Room 217 on the second floor. The Handgun is sitting in a red shopping cart. If you are also working on Let’s NOT Party!, remember to save at least 11 bullets for the balloons in Room 207. Steel Pipe Location: South Vale (West) Shortly after meeting Maria and progressing beyond Jacks Inn, continue until the road collapses during a story sequence. James will automatically obtain the Steel Pipe afterward. Shotgun Location: Brookhaven Hospital On the second floor, enter the Women’s Locker Room on the west side of the hospital. The Shotgun is inside an open locker. Rifle Location: Toluca Prison The Rifle is found inside a locked gun cabinet in the Armory. After progressing through the Serpent Door and completing the generator puzzle, return through Cell E1 and access the western side of the area. The Armory Key is located in the room south of the Witness Checkpoint. Take it back to the Armory and open the cabinet. Once you have scored at least one kill with all five weapons during the same playthrough, the trophy will unlock.
Tip
The easiest way to track this is to intentionally get one kill immediately after obtaining each new weapon. That way you never have to wonder later whether that Shotgun blast actually finished the enemy or just made it extremely unhappy.
Warning
All five kills must be completed in a single playthrough. Progress does not carry over into New Game+.
Video Guide: https://www.youtube.com/watch?v=5onUBVsRBW0

Trophy: Leftovers
Find the pizza in Pete's Bowl-O-Rama.
Type: Bronze
Category: Missable
Unlock Details
Find the pizza inside Pete’s Bowl-O-Rama. After meeting Maria at Rosewater Park, continue until you reach Jacks Inn. Before entering the motel, head west to Pete’s Bowl-O-Rama. Once inside, look for the pizza sitting on the counter near the bowling lanes and interact with it to unlock the trophy.
Tip
This interaction also counts toward Pieces Unarranged, so it is worth grabbing even if the pizza itself looks like it has been sitting there since the original game.
Warning
Do this before progressing too far beyond Jacks Inn, since the area will not remain available forever.
Video Guide: https://www.youtube.com/watch?v=NGrO3wJLabs

Trophy: Let's NOT Party!
Shoot all the balloons in Wood Side Apartments.
Type: Bronze
Category: Missable
Unlock Details
Shoot all 11 balloons inside Room 207 of Wood Side Apartments. First, collect the Handgun from Room 217 on the second floor. From that point on, start saving ammunition until you have at least 11 bullets available. Head to Room 207 on the same floor. There are enemies inside, so deal with them first if you want a clean shot at the balloons. The balloons form a welcome message across the room. Shoot each balloon until all 11 have been popped, and the trophy will unlock.
Tip
Make a manual save before doing this. After the trophy pops, reload your save if you want those bullets back. Ammunition is more useful in James’ pocket than decorating the floor with sad balloon remains.
Warning
This is missable. Make sure you complete it before leaving Wood Side Apartments.
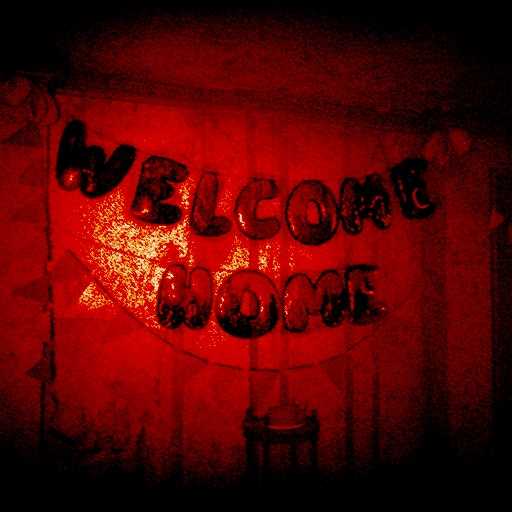
Trophy: Nightmare Fuel
Defeat the Flesh Lip.
Type: Bronze
Category: Missable
Unlock Details
Defeat the Flesh Lip in Brookhaven Hospital. After the rooftop sequence, continue through the east side of the third floor and follow Laura until the story leads you into the boss fight. During the first phase, Flesh Lip spends much of the fight moving across the ceiling. Watch the marks it leaves overhead and listen for its movement so you can anticipate where it will drop. When it comes down and is not actively swinging, move in with the Steel Pipe or attack from range with the Handgun or Shotgun. If you are using firearms, try to aim through the gaps in the metal frame for cleaner hits. Later in the fight, Flesh Lip spends more time on the ground and becomes much more aggressive. Its charge is best avoided with a well-timed dodge, while the stomping sequence can last several hits. Wait for the full combo to finish, then punish the recovery window.
Tip
Patience makes this fight much easier. Do not chase it around the room while it is on the ceiling. Let it come to you, dodge the drop, and take your damage when the opening is safe.
Warning
Once the ground phase begins, avoid attacking too early after a stomp. The combo can continue for several hits, and getting impatient is a fast way to turn James into hospital paperwork.

Trophy: Pieces Unarranged
Collect all the Strange Photos in a single playthrough.
Type: Silver
Category: Missable
Unlock Details
Collect all 26 Strange Photos in a single playthrough. The photos do not carry over between runs, and several areas become permanently inaccessible after you leave them, so this is best handled as part of a dedicated collectible run. Strange Photo #1 – “So many people here!” South Vale (East) At the entrance to Wood Side Apartments, look to the left of the front door near the black trash bag and dumpster. Strange Photo #2 – “I’ve been happy” South Vale (East) Head south along Neely Street past Neely’s Bar. Check the shop window just to the right of The Dance Company. Strange Photo #3 – “Valentine’s Day” Wood Side Apartments Once story progress opens the gate blocking the southwest side of the first floor, enter Room 102. The photo is sitting on a catering trolley. Strange Photo #4 – “Career’s humble beginnings” Wood Side Apartments On the second floor, use the balcony in Room 212 to reach Room 210. Check the window ledge in the living area. Strange Photo #5 – “Forever together” Blue Creek Apartments Check the first-floor stairwell. The photo is beside the leg of a corpse. Strange Photo #6 – “How the time flies” Blue Creek Apartments After obtaining the Second Hand for the clock puzzle, enter Room 212 and collect the photo inside. Strange Photo #7 – “So far from home” Rosewater Park On the west side of Rosewater Park, check the stone bench. Strange Photo #8 – “made it!” South Vale (West) Find the Jack Lever near Octantis Fuels, then take it to the garage just south of Rosewater Park. Use the lever to get inside and collect the photo. Strange Photo #9 – “Ready to kill it!” Heaven’s Night Check the dressing room and look on the vanity mirror. Warning: Grab this before leaving Heaven’s Night. It is very easy to miss. Strange Photo #10 – “Church entrance” Moonlight Grove In the southern part of Moonlight Grove, look on the edge of the fountain. Warning: Collect this before entering the theater. Strange Photo #11 – “Best Flavor!” Reverie Theater After the cutscene with Eddie, return to his location and move a few rows above him. The photo is tucked between the seats. Warning: Pick it up before leaving the theater. Strange Photo #12 – “Her drawings” Brookhaven Hospital When you reach the chain puzzle on the second floor, crawl through the vent opposite the Nurse’s Station to reach the Observation Room. From there, enter L3 and check the table. Strange Photo #13 – “At least she was there” Brookhaven Hospital After collecting the 1F Inner Ward Key, enter Examination Room 1 and check the drawer in the workbench. Strange Photo #14 – “No one knows” Brookhaven Hospital On the second floor, enter C5 and check the bedside table drawer. Strange Photo #15 – “They mustn’t know” Brookhaven Hospital Return to the pool area on the first floor. The photo is on a wooden bench beside a lifebuoy. Strange Photo #16 – “They’re here” South Vale (Otherworld) Check the driver’s seat of the abandoned vehicle next to Lucky Jade Restaurant. Strange Photo #17 – “The new clock” Silent Hill Historical Society Before heading down the long staircase, enter the second room on the left and check the cabinet. Warning: Pick this up before descending the staircase because you will not return. Strange Photo #18 – “Four months to go” Toluca Prison After completing the generator puzzle beyond the Serpent Door and obtaining the Medium Weight, enter E1 and break through the weak wall. Continue to E13 and collect the photo inside the cell. Strange Photo #19 – “Old man’s always prepared” Toluca Prison Enter through the Boar Door and continue into the Administrative Section. The photo is sitting on a desk inside the Warehouse. Strange Photo #20 – “Whole world ahead of us” Labyrinth In the large octagonal room, take the left path and climb the ladder at the intersection. The photo is on a box in the room above. Strange Photo #21 – “Your best buddy!” Labyrinth On your third visit to the rotating cube, rotate it until the doorway shows two upside-down triangles on either side. Enter the newly aligned room and collect the photo. Warning: Do not leave this section without grabbing it. Strange Photo #22 – “Road trip!” Toluca Lake Before getting into the boat for Lakeview Hotel, look near the building with the “Road Closed” sign on its railing. The photo is on the ground behind the steps. Strange Photo #23 – “aftermath...” Lakeview Hotel Enter Room 104 in the east wing and check the drawer. Strange Photo #24 – “Better leave...” Lakeview Hotel In the basement, go behind the bar in Venus Tears Kitchen. Tip: You cannot use the map while you are in this section, so keep the location in mind before heading downstairs. Strange Photo #25 – “Still can’t get it right” Lakeview Hotel Move the trolley so you can enter Room 302. The photo is inside the sink. Strange Photo #26 – “SHAPE FORCES THE MIND” Lakeview Hotel After the long hallway sequence, go through the door leading onto the platform. Before heading upstairs, take the path to the right and collect the photo from the floor. If you collected all 26 during the same playthrough, the trophy will unlock here.
Tip
Work on this alongside Archivist and Echoes so you can clear all three major collectible trophies in the same run instead of turning James into Silent Hill’s most exhausted tourist.
Warning
All 26 Strange Photos must be collected in one playthrough. Progress does not carry over to New Game+.
Video Guide: https://www.youtube.com/watch?v=AGsQBLQ2PFo

Trophy: Radio Silence
Complete the game without using the radio.
Type: Silver
Category: Missable
Unlock Details
Complete the entire game without using the radio. You obtain the Radio very early in South Vale (East), shortly before your first enemy encounter. As soon as you pick it up, open your inventory, highlight the Radio, and turn it off. Leave it switched off for the rest of the playthrough. The radio normally warns you about nearby enemies with static, so playing without it removes one of James’ best early-warning tools. If you want an easier time, enable the visual radio indicator in the Accessibility settings. This gives you an on-screen warning when enemies are nearby and does not prevent the trophy from unlocking.
Tip
This is perfect to combine with a New Game+ run. Once you know the enemy placements and have access to stronger gear, losing the radio is much less intimidating.
Warning
Do not turn the Radio back on at any point during the run. Once it is off, treat that inventory option like it is cursed.
Video Guide: https://www.youtube.com/watch?v=bkmx0xFMbwM

Trophy: Scourge of Toluca Lake
Spend 10 minutes out on Toluca Lake.
Type: Bronze
Category: Missable
Unlock Details
Spend 10 minutes out on Toluca Lake. After defeating Eddie, you will eventually reach the boat used to cross Toluca Lake. Before finishing the crossing, simply remain out on the lake for 10 minutes. You can sit still in the boat and let the time pass before continuing toward Lakeview Hotel. If the trophy does not unlock right away after 10 minutes, move the boat slightly with L2 and/or R2 to trigger it.
Tip
This is one of the rare moments where doing absolutely nothing is productive. Enjoy the fog, enjoy the silence, and pretend James booked a very strange boat tour.
Warning
Do this before reaching the hotel, since you will not get another chance during that playthrough.
Video Guide: https://www.youtube.com/watch?v=ef-jOD5x0DA

Trophy: Archivist
Collect all memos in a single playthrough.
Type: Silver
Category: Collectible
Unlock Details
Collect all 68 memos in a single playthrough. Most of the memos are scattered through optional rooms, side streets, desks, drawers, and puzzle areas, and several locations become inaccessible once you move on. There is one important wrinkle: Memo #61 in Lakeview Hotel is only available on a fresh playthrough, while New Game+ adds an extra Memo #69 in South Vale (West). That means Archivist can still be completed in NG+ if you missed something earlier, as long as you collect the full required set for that run. South Vale (East) Memo #1 – Flower Shop Message After unlocking Enjoy Your Stay, enter the empty flower shop on your left. The note is on the counter. Memo #2 – Matchbook After defeating the first enemy, continue to northern Martin Street. Check beside the bloodied corpse. Memo #3 – Martin Street Note Continue a short distance past the previous memo and pick up the bloodied note from the ground. Memo #4 – Big Jay’s Note At the Martin Street and Katz Street junction, turn right and enter Big Jay’s Cafe. The memo is on a table. Memo #5 – Neely’s Bar Note Head south on Neely Street to the Sanders Street junction and enter Neely’s Bar. Check the counter. Memo #6 – Small Note Go south to Saul Street Apartments. Move the blockade on the ground floor and enter the room behind it. The note is on a table. Memo #7 – Tenant’s Note Reach Apartment 7 on the upper floor using the nearby crawlspace. The note is on a table inside. Memo #8 – Old Map After leaving Saul Street Apartments, head west and check beside the corpse near the fenced path. Memo #9 – Saul Street Note (1) Continue just beyond the Old Map and collect the next note. Memo #10 – Saul Street Note (2) Continue a little farther toward the fenced area to find another note. Memo #11 – Saul Street Note (3) Go through the fenced area toward the motor home. The note is outside. Memo #12 – Motor Home Note Enter the motor home and check the table. Memo #13 – Record Store Note Enter Groovy Music at the north end of Neely Street. The note is on the store counter. Memo #14 – Sanders Street Note On Sanders Street, look beside the truck parked partway down the road. The note is near the corpse by the passenger side. Memo #15 – Code Note Check immediately beside the same corpse for another memo. Memo #16 – Texan Cafe Flyer At Wood Side Apartments, check the wooden noticeboard to the left of the entrance. Memo #17 – Barrier Notice Go as far west along Katz Street as possible. The notice is beside the blockade and corpse. Memo #18 – Back Room Letter Progress until you can open the back door of Neely’s Bar. Move the trolley, crawl through the hatch, and check the table in the room beyond. Wood Side Apartments Memo #19 – Administration Note Near reception, check inside the locker. Memo #20 – Strange Note After getting the 2F Small Staircase Key from Apartment 205, use it to reach the third floor. Enter the side room at Apartment 310 and check the drawer. Memo #21 – Sinister Note Use the balcony of Apartment 310 to enter Apartment 312. The note is pinned to the wall. There are no memos in Blue Creek Apartments. South Vale (West) Memo #22 – Bloody Note After meeting Maria, head west along Nathan Avenue before going into the motel. The memo is beside a dead body at the far end. Memo #69 – Cryptic Letter New Game+ only. Inside Pete’s Bowl-O-Rama, open the safe using code 1887. Memo #23 – Reception Desk Note At Jacks Inn, go to the downstairs reception and check the noticeboard near the safe. Memo #24 – Toolbox Memo Go upstairs to Room 108, climb through the window, break the weak wall into Room 107, and check the table beside the tools. Brookhaven Hospital Memo #25 – Key Locker Note On the ground floor, go to reception and check the noticeboard. Memo #26 – Nurse’s Memo Break the window beside Exam Room 3 to enter the small room between Exam Rooms 2 and 3. Check the desk drawer. Memo #27 – Staff Memo After leaving Maria behind, check the window of the Nurses’ Station on the second floor. Memo #28 – Interview Transcript Go to C1 on the southeast side of the second floor and interact with the poster. The transcript is hidden behind it. Memo #29 – E.C. Patient #0130 Memo #30 – E.C. Patient #0090 Memo #31 – E.C. Patient #0050 All three are together on a table inside the Director’s Office. Memo #32 – Scribbled Note Return to the first floor through L1 and enter Medical Records. The note is on the floor. Memo #33 – X-ray Memo Go to the X-Ray Room on the third floor and check the examination table. Memo #34 – Keypad Combination Note In the Doctors’ Lounge on the first floor, check the noticeboard. Memo #35 – Treatment Room Note Unlock the Nurses’ Station on the second floor using code 3578. Enter the Treatment Room and check the bench. Memo #36 – Safe Note After getting the Rooftop Key from the Director’s Office safe, pick up the note left behind it. Memo #37 – Diary From a Page Once you reach the Rooftop, head toward the door ahead and pick up the page from the floor immediately. Warning: This one is very easy to miss. Brookhaven Hospital – Otherworld Memo #38 – E.C. Patient #3141 After entering the first door of this section, check the wheelchair. Memo #39 – The Procedure Go to the third-floor X-Ray Room and check the table. Memo #40 – Patient’s Note Use the trolley to access L3 on the northeast side of the second floor. Continue to the Observation Room and check the table over the bed. Memo #41 – Calendar Page Enter M3 on the southwest side of the second floor, break through the wall into M2, and collect the calendar from the floor. Memo #42 – Manic Scribble Return to the Director’s Office. A new note will now be waiting there. Memo #43 – Nurse’s Note Climb the ladder to Room 17 and check the small table. Memo #44 – Director’s Note Reach the Restroom through the crawlspace near the generator. The note is on the floor. Memo #45 – Dissociated Notice Progress until you reach the Doctors’ Lounge on the first floor, then enter the neighboring Locker Room and check the bench. Memo #46 – Ominous Note After placing both rings on the figurine and triggering the cutscene, head downstairs. The note is sitting at an intersection along the stairs. Warning: Do not rush past it. This one is highly missable. South Vale (Otherworld) Memo #47 – Note on a Map As you move through South Vale again, go west of Saul Street Apartments and enter the caravan. Memo #48 – Letter Automatically obtained when you answer the required payphone. There are no memos in South Vale (West Revisited) or Silent Hill Historical Society. Toluca Prison Memo #49 – Gun Cabinet Notice Inside the Armory, beside the locked gun cabinet. Memo #50 – Family Photo After progressing beyond the Serpent Door, enter Cell E4 and check the bed. Memo #51 – Guard’s Letter After entering through the Ox Door, look on the wall shortly after entering. Memo #52 – Threatening Note In the same area, enter Cell D5 and check the wall. Memo #53 – Paranoid Note Use the Shiv Key to open Cell C4, crawl through the hole, and check the red pipe. Memo #54 – Crumpled Note Go through the Toilets into the Changing Room. The note is on a bench. Memo #55 – Prisoner’s Letter After going through the Boar Door, enter the Visitation Room and check the last window on the left side of the glass. Memo #56 – Unfinished Report Continue into the Infirmary and check the desk. Memo #57 – Confession Go through the Dove Door to the Basement and enter Cell F6. The confession is on the wall. There are no memos in the Labyrinth or Toluca Lake. Lakeview Hotel Memo #58 – Cleaning Staff Memo #1 In the downstairs Utility Room, check the table near the wall calendar. Memo #59 – Receptionist Memo Back upstairs, check the Check-in desk counter. Memo #60 – Laura’s Letter Automatically obtained after the cutscene with Laura in Lake Shore Restaurant. Memo #61 – Lost & Found Note On the first floor, enter Lost & Found and check the shelf. Warning: This memo is not available in New Game+. It only appears on the initial playthrough of a save file. Memo #62 – Photo #3 In the second-floor Reading Room, solve the puzzle to access Room 205. Collect the photo inside. Memo #63 – Photo #2 In the same room, check the bed. Memo #64 – Photo #1 Still in the same room, check the opposite side of the bed. Memo #65 – Cleaning Staff Note #2 Later, on the third floor, enter the Conference Room and check the fireplace. Memo #66 – Cleaning Staff Note #3 Use the required key to enter Room 107. The note is on a table beside a vacuum. Memo #67 – Keypad Numbers Memo In the Employee Section, complete the Manager’s Office puzzle and collect the memo inside. Memo #68 – Burned Note When you return to the Manager’s Office in the Otherworld, check the table for the final memo.
Tip
Do Archivist alongside Pieces Unarranged and Echoes so you can sweep all three major collectible categories in the same playthrough.
Warning
Because so many locations have points of no return, check off memos area by area instead of trying to remember what you missed later. Silent Hill already has enough mysteries without adding “which one of the 68 notes did I forget?” to the list.
Video Guide: https://www.youtube.com/watch?v=k6Urj0Vpcac

Trophy: Echoes
Witness all glimpses of the past in a single playthrough.
Type: Gold
Category: Collectible
Unlock Details
Witness all 26 Glimpses of the Past in a single playthrough. These are interactive callbacks to the original Silent Hill 2. When you activate one, you will hear a distinctive nursery-rhyme-like sound cue. You must actually interact with each one for it to count. Glimpse #1 Silent Hill Ranch Very early in the game, interact with the barricaded tunnel. This is also a good introduction to the sound cue that confirms a Glimpse has registered. Glimpse #2 South Vale (East) Shortly after seeing your first enemy, look for the fence with the “DO NOT ENTER” sign and interact with it. Glimpse #3 South Vale (East) After killing your first enemy, leave the building through the window and pass through the gate. Before continuing along the main path, turn right and examine the bloodstains. Glimpse #4 South Vale (East) At Wood Side Apartments, interact with the dumpster on the right side of the building. Glimpse #5 South Vale (East) Go to the westernmost end of Katz Street and interact with the white barricade. Glimpse #6 Wood Side Apartments After obtaining the 2F Hallway Key, enter Apartment 213 and examine the markings on the wall. Glimpse #7 Blue Creek Apartments Enter Room 110 and interact with the broken television stand. Glimpse #8 Blue Creek Apartments After completing the Second Hand portion of the clock puzzle, head toward the door marked “S.” Before going downstairs, examine the corpse in the stairwell. Glimpse #9 South Vale (West) Enter Pete’s Bowl-O-Rama and interact with the pizza near the bowling lanes. This also unlocks Leftovers if you have not earned it already. Glimpse #10 South Vale (West) From Pete’s Bowl-O-Rama, head to the next building south and interact with the barred front entrance. Glimpse #11 Brookhaven Hospital On the second floor, enter the Laundry Room and examine the crumpled paper inside the bin. Glimpse #12 Brookhaven Hospital Go to M1 and interact with the bed wrapped in chains. Glimpse #13 Brookhaven Hospital Go to Medical Records on the first floor and examine the typewriter on the west side of the room. Glimpse #14 Brookhaven Hospital Once you reach the Rooftop, interact with the broken section of fencing. Warning: Do this before entering the next room. This one is highly missable. Glimpse #15 Brookhaven Hospital After the rooftop cutscene, enter Room I3 and examine the wall behind the door. Glimpse #16 Brookhaven Hospital – Otherworld Interact with the northeast wall inside M5. Glimpse #17 South Vale (Otherworld) When you return to Neely’s Bar, interact with the map sitting on the bar counter. There are no Glimpses of the Past in South Vale (West Revisited) or the Silent Hill Historical Society. Glimpse #18 Toluca Prison At the beginning of the area in the Canteen, check the dining table on the right and interact with the wooden tablet. Glimpse #19 Toluca Prison Continue to Cell A3 and examine the wooden tablet sitting on the small wall shelf. Glimpse #20 Toluca Prison After going through the Ox Door, enter the large Showers room. At the southern end, interact with the tablet covered by a sheet on the floor. Glimpse #21 Toluca Prison Go through the Boar Door and head southwest of the Break Room. Examine the object lying on the floor. Glimpse #22 Labyrinth Head west from the Suspended Cage and break through the weak wall. Inside the next caged area, interact with the broken noose. There are no Glimpses of the Past at Toluca Lake. Glimpse #23 Lakeview Hotel Garden Before entering the hotel, head to the eastern side of the garden. Check the dry fountain and interact with the camera inside. Glimpse #24 Lakeview Hotel On the second floor, enter Room 212 and interact with the suitcase. Glimpse #25 Lakeview Hotel In the west wing, enter the Pantry and examine the broken camera sitting on a shelf. Glimpse #26 Lakeview Hotel – Otherworld The final Glimpse is in the Reading Room. Look for the tape recorder and headset sitting on the worn-out couch and interact with them. If you activated all 26 during this playthrough, the trophy will unlock here.
Tip
Work on Echoes alongside Archivist and Pieces Unarranged. All three require a complete collectible set within one playthrough, so combining them saves a lot of unnecessary wandering through the fog.
Warning
All 26 Glimpses must be activated in the same playthrough. Hearing the special sound after interacting is your confirmation that each one counted.
Video Guide: https://www.youtube.com/watch?v=5Cl_C-9bzj0

Trophy: Blunt Force Trauma
Kill 75 enemies with melee weapons.
Type: Bronze
Category: Grind
Unlock Details
Kill 75 enemies with melee weapons. The Wooden Plank and Steel Pipe are both available during your first playthrough, while the Chainsaw becomes available in New Game+. Use R2 at close range to attack. Most enemies will not sit politely through a full combo, so get used to landing a hit or two, dodging, then moving back in when there is another opening. Enemies that fall to the ground are also good opportunities for extra melee damage. If one is still moving, keep hitting it until you are sure the final blow came from your melee weapon. This trophy carries across multiple playthroughs, although you will likely make a lot of progress toward it naturally during your first run.
Tip
If you still need kills in New Game+, the Chainsaw makes cleanup much faster. It is hard to argue with a weapon whose main strategy is basically “stand nearby and ruin the monster’s afternoon.”

Trophy: Merciless
Finish off 50 enemies with a stomp attack.
Type: Bronze
Category: Grind
Unlock Details
Finish off 50 enemies with stomp attacks. A stomp can only be performed while an enemy is on the ground. Stand directly over the downed enemy and lightly tap R2 to stomp. The timing and positioning can be a little awkward, so try to get used to lining James up directly over the enemy before pressing R2. A very useful farming opportunity appears beneath the Silent Hill Historical Society. After entering the room containing the Spiral-writing Key, a trap sequence begins where bugs continuously spawn until you complete the puzzle. These bugs count toward the trophy, making this an easy place to repeatedly stomp enemies until you reach 50. Your progress also carries across multiple playthroughs, so you do not need to earn all 50 in one run.
Tip
If you use the bug room for farming, do not solve the puzzle until you are finished. The bugs keep coming, which is terrible for James but excellent for trophy hunters.

Trophy: No Big Deal
Kill 75 enemies with ranged weapons.
Type: Bronze
Category: Grind
Unlock Details
Kill 75 enemies with ranged weapons. The Handgun, Shotgun, and Rifle all count toward this trophy. Your first firearm is found in Wood Side Apartments, so this grind begins a little later than the melee one. What matters is the final hit. You can weaken an enemy with melee attacks first, then finish it with a gunshot to make the kill count toward this trophy. Ammo usage depends on your combat difficulty, the enemy type, the weapon you are using, and how much health the enemy has left, so there is no reason to waste bullets trying to do every bit of damage from range. Progress carries across multiple playthroughs and saves, so if you do not reach 75 kills during your first run, just continue working on it later.
Tip
Mix melee and ranged attacks instead of burning through ammo. Softening enemies up first and using a bullet for the finishing hit is much more efficient.
Warning
If you are still working on Let's NOT Party! in Wood Side Apartments, save at least 11 Handgun bullets for the balloons before spending ammo freely.

Trophy: Shattered
Destroy 50 windows.
Type: Bronze
Category: Grind
Unlock Details
Destroy 50 windows. Windows can be broken either with melee attacks or gunfire, but melee is the much better option since it does not waste ammunition. A good place to start working on this is South Vale (East), where there are plenty of abandoned cars. Each vehicle can give you multiple windows to smash, so breaking them as you pass by will build progress quickly. Storefronts, building windows, and other breakable glass also count. Keep smashing windows whenever you see an easy opportunity. Progress carries across multiple playthroughs, although you can comfortably finish all 50 during your first run.
Tip
Cars are especially useful because one vehicle can give you several windows at once. James may have unresolved emotional issues, but at least now he has a productive outlet.

Trophy: Defy Even Death
Reach the "Rebirth" ending.
Type: Silver
Category: Ending
Unlock Details
Reach the Rebirth ending. This ending is only available in New Game+. To trigger it, you must collect four specific occult items during the same playthrough, then finish the game. Crimson Ceremony Location: Graveyard At the beginning of the game, return to the graveyard where you meet Angela. Look for a grave near the shoreline beside a tree. The book is sitting in front of the grave. White Chrism Location: South Vale (West) After passing through Jacks Inn, head to the entrance of Baldwin Mansion. The bottle is sitting on a table inside. Obsidian Goblet Location: Silent Hill Historical Society In the main room containing the Red Pyramid Thing painting, turn around and check the wall behind you. The Goblet is hidden inside a wall crevice. Lost Memories Location: Lakeview Hotel On the first floor, enter the Lost & Found room and check the shelf for the book. Once you have collected all four items, continue to the end of the game. The Rebirth ending will trigger automatically.
Tip
Grab each item as soon as you reach its area. They are spread across the entire game, so missing an early one can turn a simple ending run into a very long cleanup trip.
Warning
Collecting all four Rebirth items locks you into this ending for that playthrough. If you are planning to earn several New Game+ endings from one run, make a backup save before collecting the final required item or structure your saves carefully.
Video Guide: https://www.youtube.com/watch?v=_KJGwRgrego

Trophy: Making Peace
Reach the "Leave" ending.
Type: Silver
Category: Ending
Unlock Details
Reach the Leave ending. Silent Hill 2 does not choose this ending based on one single decision. Instead, the game watches James’ behavior throughout the playthrough, so your goal is to consistently push the hidden ending factors toward Leave. To improve your chances: Keep James healed and avoid leaving him in critical health for long periods. Examine Mary’s Photo and Mary’s Letter several times during the game. Do not examine Angela’s Knife. After defeating the two Pyramid Heads, listen to the entire conversation in the long hallway without rushing through it. Avoid spending unnecessary time with Maria or checking on her more than required by the story. Use the Rotten Apple for the Mirror Puzzle at Lakeview Hotel. After the two Pyramid Heads fight, go through the Rust Colored Egg door. Try to finish the game with fewer than 150 enemy kills. During the first Pyramid Head encounter, let the timer expire instead of dealing enough damage to end the fight early. For the Coin Puzzle in Wood Side Apartments, choose the Snake Coin. Because several ending factors are tracked throughout the full game, following as many of these conditions as possible gives you the best chance of getting Leave.
Tip
Make a manual save late in Lakeview Hotel before the final stretch. This gives you a chance to adjust the last few ending factors and reload if you receive a different ending.
Warning
The Leave ending can be missed even if you follow several of these steps, because the game weighs multiple hidden factors together rather than using a simple checklist.
Video Guide: https://www.youtube.com/watch?v=4YUZ6YiRwTo

Trophy: Only Way Out
Reach the "In Water" ending.
Type: Silver
Category: Ending
Unlock Details
Reach the In Water ending. This ending is influenced by James’ behavior throughout the game, especially actions that push him toward poor health, violence, and despair. To improve your chances: Avoid healing James too often and spend longer periods in critical health. Examine Angela’s Knife. Do not examine Mary’s Photo, Mary’s Letter, or Mary’s Handkerchief. After defeating the two Pyramid Heads, listen to the full conversation in the long hallway. Use the Rotten Apple for the Mirror Puzzle at Lakeview Hotel. Go through the Rust Colored Egg door after the two Pyramid Heads fight. Kill more than 350 enemies during the playthrough. Stomp more than 30 defeated enemies. After watching the videotape in Room 312, kill all three defenseless enemies in Lakeview Hotel. During the first Pyramid Head encounter, deal enough damage to end the fight early instead of simply waiting for the timer to expire. For the Coin Puzzle in Wood Side Apartments, choose the Man Coin. Interact with the wall message at Neely’s Bar. Because the ending system tracks several hidden factors, the more of these conditions you meet, the better your chances of receiving In Water.
Tip
A late manual save in Lakeview Hotel is extremely useful. If you are already close to the correct ending conditions, you can reload and adjust the final few factors without replaying the entire game.
Warning
Do not rely on just one or two choices. This ending is based on a combination of behaviors, so treat the whole playthrough as part of the setup.
Video Guide: https://www.youtube.com/watch?v=UOunt50KV7Q

Unlock Details
Reach the In Water ending.
This ending is influenced by James’ behavior throughout the game, especially actions that push him toward poor health, violence, and despair.
To improve your chances:
Avoid healing James too often and spend longer periods in critical health.
Examine Angela’s Knife.
Do not examine Mary’s Photo, Mary’s Letter, or Mary’s Handkerchief.
After defeating the two Pyramid Heads, listen to the full conversation in the long hallway.
Use the Rotten Apple for the Mirror Puzzle at Lakeview Hotel.
Go through the Rust Colored Egg door after the two Pyramid Heads fight.
Kill more than 350 enemies during the playthrough.
Stomp more than 30 defeated enemies.
After watching the videotape in Room 312, kill all three defenseless enemies in Lakeview Hotel.
During the first Pyramid Head encounter, deal enough damage to end the fight early instead of simply waiting for the timer to expire.
For the Coin Puzzle in Wood Side Apartments, choose the Man Coin.
Interact with the wall message at Neely’s Bar.
Because the ending system tracks several hidden factors, the more of these conditions you meet, the better your chances of receiving In Water.
Tip
A late manual save in Lakeview Hotel is extremely useful. If you are already close to the correct ending conditions, you can reload and adjust the final few factors without replaying the entire game.
Warning
Do not rely on just one or two choices. This ending is based on a combination of behaviors, so treat the whole playthrough as part of the setup.
Trophy: Party Like It's 2001
See all classic endings (Leave, Maria, In Water, Rebirth, Dog).
Type: Gold
Category: Ending
Unlock Details
See all five classic endings required for this trophy: Leave Maria In Water Rebirth Dog The UFO ending is not required. Leave, Maria, and In Water can all be earned on a normal playthrough, while Rebirth and Dog require New Game+. Each ending is recorded to your profile once you have seen it, so you do not need to earn all five in the same save run. You can also reduce the number of full playthroughs by using strategic late-game saves and reloading to trigger multiple endings from the same run. For the individual requirements, see: Making Peace – Leave ending Vicious Circle – Maria ending Only Way Out – In Water ending Defy Even Death – Rebirth ending The Goodest Boi – Dog ending
Tip
Plan your ending runs before starting them. The three standard endings can often be stacked around one late-game save, while Rebirth and Dog can be handled in New Game+ with careful item collection.
Warning
The UFO ending does not count toward this trophy, even though it is one of the classic endings from the original game.
Video Guide: https://www.youtube.com/watch?v=aoaSttkwiMw

Trophy: The Goodest Boi
Reach the "Dog" ending.
Type: Silver
Category: Ending
Unlock Details
Reach the Dog ending. This ending is only available in New Game+. You need to find both halves of the Dog Key, combine them, then use the completed key on the Observation Room door on the third floor of Lakeview Hotel. Broken Key Part #1 Location: South Vale (East) Head to The Pet Center next to Big Jay’s Diner on Neely Street. Go into the back room and collect the first Broken Key Part. Broken Key Part #2 Location: South Vale (West) Continue past Baldwin Mansion along Katz Street and look for a gate beside the first house on the north side. Go through the gate and check the doghouse to find the second Broken Key Part. Once you have both pieces, combine them in your inventory to create the Dog Key. Later, at Lakeview Hotel, head to the third floor and use the Dog Key on the Observation Room door next to Room 312. The ending will trigger as soon as you enter.
Tip
Pick up both key pieces as soon as you reach their areas so you do not have to worry about backtracking later.
Warning
This is New Game+ only. If you miss either key piece and progress too far, you can lock yourself out of the ending for that run. And yes, after everything James has been through, the truth is apparently that a very good boy may have been running the whole operation.
Video Guide: https://www.youtube.com/watch?v=U_ArZ73RxCw

Trophy: Tinfoil Hat
Reach the "UFO" ending.
Type: Silver
Category: Ending
Unlock Details
Reach the UFO ending. This ending is only available in New Game+. First, find the Blue Gem by breaking the window of Weller’s store in South Vale (East). Once you have it, you need to inspect the Blue Gem at four specific locations during the same playthrough. Open your inventory, select the gem, and inspect it. If you are in the correct spot, it will glow and you will hear a UFO sound effect. Location #1 South Vale (East) Go to the rooftop of Saul Street Apartments. Look for the eye graffiti on the back of a vent. Stand near it and inspect the Blue Gem. Location #2 South Vale (West) – Rosewater Park Return to the gazebo where James first meets Maria. Inspect the Blue Gem while standing in the gazebo. Location #3 Lakeview Hotel After crossing Toluca Lake by boat, inspect the Blue Gem as soon as you arrive at the hotel side of the lake. Location #4 Lakeview Hotel – Room 312 Enter Room 312 and inspect the Blue Gem one final time. This will trigger the UFO ending and unlock the trophy.
Tip
The glow and UFO sound are your confirmation that each location registered correctly, so do not leave an area until you see and hear both.
Warning
This is New Game+ only, and all four Blue Gem interactions must be completed in the same playthrough. Missing an earlier location will prevent the ending from triggering. After all the grief, monsters, guilt, and fog, Silent Hill apparently decides the most reasonable conclusion is aliens.
Video Guide: https://www.youtube.com/watch?v=4Z4cJaX3Xi4

Trophy: Vicious Circle
Reach the "Maria" ending.
Type: Silver
Category: Ending
Unlock Details
Reach the Maria ending. This ending is influenced by how James behaves toward Maria throughout the game, so the safest approach is to consistently favor her while avoiding actions tied to Mary or Angela. To improve your chances: Check on Maria frequently and protect her whenever possible. Trigger extra conversations with her when opportunities appear, such as near the Silent Hill Historical Society, upstairs at Jacks Inn while she is holding the dress, and near Baldwin Mansion. During Brookhaven Hospital, return to check on Maria as you progress. Two additional scenes can be triggered after obtaining your first bracelet and again after obtaining the Rooftop Key. Checking on Maria again during the Labyrinth may also help push the ending in her direction. Do not examine Mary’s Photo, Mary’s Letter, or Mary’s Handkerchief. Do not examine Angela’s Knife. Use the Ripe Apple for the Mirror Puzzle at Lakeview Hotel. This is one of the most important choices for this ending. After the fight with the two Pyramid Heads, do not listen to the entire hallway conversation. Go through the Scarlet Colored Egg door. For the Coin Puzzle in Wood Side Apartments, choose the Woman Coin. A useful clue appears just before the final boss. If Mary is lying on the bed when James climbs the stairs instead of looking out the window, that is a strong sign you have successfully pushed the game toward the Maria ending.
Tip
Prioritize this ending on your first playthrough if you are trying to minimize cleanup. Its requirements depend on behavior spread across a large portion of the game, making it harder to force at the very end.
Warning
There is no single choice that guarantees the Maria ending. The game combines several hidden factors, so follow as many of these conditions as possible from the moment you meet Maria.
Video Guide: https://www.youtube.com/watch?v=jKWQmCL-TFg

Trophy: I Saw That Town
Complete New Game Plus on any difficulty.
Type: Silver
Category: Misc
Unlock Details
Complete the game in New Game+ on any difficulty. After finishing the game once, start a New Game+ playthrough from the main menu and complete the story again. New Game+ adds several exclusive items, endings, and weapons, including the Chainsaw and the requirements for endings such as Rebirth, Dog, and UFO. You can finish with any ending and on any difficulty. The trophy unlocks once the New Game+ run is completed.
Tip
Use this run to combine as much cleanup as possible. New Game+ is the best place to work on Lumberjack, the joke endings, Radio Silence, and As Close as You Like.
Warning
Collectibles for Archivist, Pieces Unarranged, and Echoes do not carry over. If you miss one of those sets, you will need to collect the entire set again in a new run.

Trophy: Lumberjack
Find the chainsaw.
Type: Bronze
Category: Misc
Unlock Details
Find and pick up the Chainsaw in New Game+. You must first complete the game once, then start a New Game+ playthrough from the main menu. During the opening walk toward Silent Hill Ranch, listen for the sound of a running chainsaw. You will find it lodged in a large wooden log along the route. Pick it up and the trophy will unlock immediately.
Tip
The Chainsaw is extremely powerful and is perfect for your New Game+ melee-focused run. It can make As Close as You Like much easier and turns a lot of enemies into very short encounters.
Warning
The Chainsaw is only available in New Game+.
Video Guide: https://www.youtube.com/watch?v=GCU5Dan93fc

Trophy: No Turning Back Now
Try to leave Silent Hill in the Observation Deck area.
Type: Bronze
Category: Misc
Unlock Details
At the very beginning of the game, once you gain control of James at the Observation Deck, turn around and walk back up the road in the direction his car came from. Keep going until the game stops you and forces James to turn back. The trophy will unlock immediately.
Tip
Do this before heading down the path toward Silent Hill. It only takes a few seconds and saves you from remembering it later.
Video Guide: https://www.youtube.com/watch?v=BohWHK6hx-0

Trophy: You Never Know...
Try to open locked doors 50 times.
Type: Bronze
Category: Misc
Unlock Details
Try to open 50 locked or barricaded doors. Silent Hill 2 Remake is absolutely packed with doors that refuse to cooperate, so this should come naturally if you regularly check rooms while exploring. Whenever you see a door, interact with it even if it looks like it might be locked. Once you have tried 50 locked or blocked doors, the trophy will unlock.
Tip
You do not need to farm this. Just keep checking doors as you explore and the game will eventually reward your determination to jiggle every handle in town.

Trophy: A Human Being
Kill Eddie.
Type: Bronze
Category: Story
Unlock Details
Defeat Eddie in the Labyrinth. After completing the Rotten Area and Desolate Area, continue into the Ruined Area until you reach the blood-stained metal door. The fight begins shortly after. Eddie spends much of the first phase hiding behind the hanging meat and firing at you with his revolver. Use the carcasses as cover, keep moving, and attack whenever he exposes himself. The Shotgun works especially well here. If you get close enough after staggering him, follow up with the Steel Pipe for extra damage before he retreats. As the fight continues, visibility gets much worse and Eddie becomes harder to track. Listen for his footsteps and wait for him to close the distance. Dodge when he attacks, then punish him with the Shotgun or melee before backing off again. In the final phase, the hanging meat begins moving, making cover less reliable. Stay mobile, avoid standing in the open for too long, and keep repeating the same basic pattern until Eddie goes down.
Tip
Sound is just as important as sight in the later phases. If you cannot see Eddie clearly, listen for him approaching instead of blindly running around the room.

Trophy: Admitted
Reach Brookhaven Hospital.
Type: Bronze
Category: Story
Unlock Details
Reach Brookhaven Hospital. Continue through South Vale (West) and complete the events at Reverie Theater. Afterward, the story will lead you to Brookhaven Hospital. The trophy unlocks automatically once you arrive.

Trophy: Alone Again
Survive the chase in Brookhaven Hospital.
Type: Bronze
Category: Story
Unlock Details
Survive the chase near the end of Brookhaven Hospital. This section is short and completely linear. Stay with Maria, keep moving forward, and follow the only available route through the hospital. Reach the elevator and complete the following cutscene to unlock the trophy automatically.
Tip
Do not stop to fight unless something is directly blocking your path. This section is about escaping, not clearing the hospital one monster at a time.

Trophy: Enjoy Your Stay
Reach Silent Hill.
Type: Bronze
Category: Story
Unlock Details
Continue through the opening area until James reaches Silent Hill. The route is mostly straightforward. Once you arrive in the eastern side of South Vale and receive the town map during the story, the trophy will unlock automatically.

Trophy: Glimmer of Hope
Reach the Lakeview Hotel.
Type: Bronze
Category: Story
Unlock Details
Reach the Lakeview Hotel. Near the end of the game, you will arrive at Toluca Lake and use a boat to cross the fog-covered water. Continue rowing toward Lakeview Hotel and make your way into the Garden area. The trophy will unlock automatically once you arrive.

Trophy: Inner Sanctum
Find His room.
Type: Bronze
Category: Story
Unlock Details
Find the hidden room in the Labyrinth. As you progress through the Labyrinth, you will eventually reach an octagonal room where Pyramid Head begins chasing you. Move toward the path on the opposite side from where he enters and go through the doorway. The trophy will unlock as soon as you enter the room.
Tip
Before leaving this area, make sure to grab the Strange Photo found here if you are working toward Pieces Unarranged.

Trophy: Into the Abyss
Reach the end of the long staircase.
Type: Bronze
Category: Story
Unlock Details
Reach the bottom of the long staircase inside the Silent Hill Historical Society. During the second half of the game, the story will eventually lead you to the Historical Society. Follow the main route through the building until you reach the extremely long staircase heading downward. Keep descending until you reach the bottom, and the trophy will unlock automatically.
Tip
There is nothing special you need to do here besides keep going. The staircase is just very committed to making sure you know you are heading somewhere unpleasant.

Trophy: Nice and Cozy
Reach Wood Side Apartments.
Type: Bronze
Category: Story
Unlock Details
Reach and enter Wood Side Apartments. After completing the Jukebox Puzzle at Nelly’s Bar, continue through the back room and collect the Wood Side Apartments Key. Once you are back outside, head west toward Katz Street and make your way to the apartment building. Use the key on the front entrance and step inside to unlock the trophy.
Tip
The streets get a little less welcoming on the way there, but you do not need to clear every enemy. If the path is open, running is perfectly acceptable survival-horror etiquette.

Trophy: Obsolete
Destroy what you don't need.
Type: Bronze
Category: Story
Unlock Details
Defeat the two Pyramid Heads near the end of Lakeview Hotel. After the events in Room 312, continue through the Otherworld version of the hotel until you reach the basement and the final save point with nine red squares. The boss fight is just beyond the next door. During the fight, both Pyramid Heads will attack with spears. The biggest danger is getting trapped between them, so keep moving and try to keep both enemies in view. Focus your damage on one at a time. Their spear thrusts are often followed by a wide swing, so dodge first and only fire when you have a clear opening. The Shotgun and Rifle work especially well here. If one of them throws its spear, dodge the throw and use the recovery window while it walks over to retrieve the weapon. That gives you one of the safest opportunities to deal damage. Once you have inflicted enough damage, both Pyramid Heads will move to the center of the arena and the fight will end automatically.
Tip
Positioning matters more than raw damage here. If both bosses start closing in from opposite sides, stop attacking and reposition before you get boxed in.
Warning
This is one of those fights where greed gets punished fast. A few extra shots are not worth getting caught between two giant spear-wielding executioners.

Trophy: Otherworldly
Enter the Otherworld for the first time.
Type: Bronze
Category: Story
Unlock Details
Enter the Otherworld for the first time. Near the end of Wood Side Apartments, continue through Apartment 201 and watch the story scene that follows. Afterward, go through the newly opened path and continue forward. James will cross into the Otherworld during the next sequence, unlocking the trophy automatically.

Trophy: Passed
Make your way out of Blue Creek Apartments.
Type: Bronze
Category: Story
Unlock Details
Escape Blue Creek Apartments. After solving the Grandfather Clock puzzle and placing the Second Hand, the door marked with the “S” symbol will open and lead into your first encounter with Pyramid Head. This fight is more about surviving than defeating him. Pyramid Head moves slowly but hits extremely hard with the Great Knife, so keep your distance and dodge his wide swings with Circle. You can simply survive until the encounter ends on its own. The first phase lasts about 60 seconds and the second around 120 seconds. Dealing damage can shorten the fight, but it is not required. If you want to attack, use the Handgun from a safe distance and keep circling the arena. There is extra ammunition and health on the pipes along both sides of the room if you need them. Eventually, a siren will sound and Pyramid Head will leave. Continue forward and the trophy will unlock as part of the story.
Tip
Do not get greedy with melee attacks. Pyramid Head is slow, but that Great Knife has the subtlety of a falling refrigerator. Dodge first, attack second.

Trophy: That Part of Me
Defeat Her.
Type: Bronze
Category: Story
Unlock Details
Defeat the final boss after the fight against the two Pyramid Heads. After Obsolete, continue through the long hallway and across the metal platform until the next boss encounter begins. The fight has three phases. During the first phase, keep a medium distance and use the Rifle or Shotgun between her attacks. She can send moths toward James, swing the metal frame, lash out with a tentacle, or try to grab him. Move side to side to avoid the moths, or knock them away with the Steel Pipe if needed. Once enough damage is dealt, the fight moves into a lower area. Here, she behaves more like Flesh Lip, moving above you and dropping down to attack. Watch where she lands and use those moments to deal damage while she is exposed. In the final phase, she becomes more aggressive and uses parts of the frame like legs to charge at James. She can also chain together multiple sweeping attacks. Dodge the full sequence before retaliating, then back away and wait for the next opening.
Tip
Do not rush this fight. Her attacks are much easier to handle when you keep your distance, wait for a clear opening, and fire after a successful dodge.

Trophy: Truly Special
Reach Room 312.
Type: Bronze
Category: Story
Unlock Details
Reach Room 312 in Lakeview Hotel. After collecting all three figurines, return to the hotel Reception and solve the Music Box puzzle. Completing the puzzle gives you the 3F Corridor Key. Use it to reach the third-floor corridor, then continue to Room 312. The trophy unlocks as soon as you enter the room.

Trophy: Uncanny
Meet Maria.
Type: Bronze
Category: Story
Unlock Details
Meet Maria. After leaving Blue Creek Apartments, continue through Rosewater Park in South Vale (West) and follow the path toward the place James believes Mary was leading him to. A cutscene will eventually trigger, and the trophy will unlock automatically once James meets Maria. Warning: Your behavior around Maria can affect the Maria ending later in the game, so if you are aiming for Vicious Circle, be mindful of how you treat her throughout the playthrough.

Trophy: Unforgivable
Defeat the Abstract Daddy.
Type: Bronze
Category: Story
Unlock Details
Defeat Abstract Daddy in the Labyrinth. After completing the Hangman Puzzle in Toluca Prison, continue into the Labyrinth and progress until the story leads you into the fight. During the first phase, Abstract Daddy will pursue you through a distorted maze. Deal enough damage to make it disappear temporarily, then use that opening to search for and destroy the three televisions scattered around the area. Each television opens up more of the maze. Once all three are destroyed, the environment changes and the fight moves into its final phase. Abstract Daddy has a fast charge, close-range swings, a grab attack, and a scream that can briefly stun James if you keep too much distance. If you are grabbed, mash Cross to break free. The safest approach is to stay fairly close, circle around the boss, dodge with Circle when it commits to an attack, and punish the recovery window. Its moves are aggressive but readable, so patience and positioning matter more than rushing damage.
Tip
Staying close actually makes this fight more manageable. It reduces how often Abstract Daddy uses its charge and scream, while giving you clearer opportunities to dodge and counterattack.

Silent Hill 2 Remake is best experienced blind the first time, but if you want the most efficient Platinum route, this first playthrough should also be your big collectible and combat run. The game has multiple points of no return, and most collectible sets need to be completed within a single playthrough, so make sure you thoroughly clear each area before moving on.
Use Light Combat and Light Puzzle difficulty if you want the smoothest trophy run. Focus on collecting every Strange Photo, Memo, and Glimpse of the Past while naturally working on combat trophies such as Merciless, No Big Deal, Blunt Force Trauma, James of All Trades, You Never Know..., and Shattered. There are plenty of enemies and breakable windows throughout the game, so most of this can be handled without dedicated grinding.
For endings, the best target to prioritize is Maria, because its requirements are the easiest to accidentally disrupt. Your health management, interactions with Maria, and which items you examine all influence the ending you receive, so start shaping that outcome from early in the run rather than trying to force it at the last minute.
Keep clearing each major area completely before progressing. Silent Hill 2 Remake has a habit of quietly locking the door behind you after you move on, so if you still have collectibles or optional trophies in an area, finish them first.
This is also a good time to make steady progress on the cumulative combat trophies. Finish downed enemies with stomp attacks, alternate between melee and firearms, and make sure you get at least one kill with the Wooden Plank, Steel Pipe, Handgun, Shotgun, and Rifle during the same playthrough for James of All Trades.
Continue following the requirements for the Maria ending while gathering everything for Pieces Unarranged, Archivist, and Echoes. These three are the main collectible-heavy trophies you do not want to discover you missed after crossing a point of no return.
At Lakeview Hotel, make a manual save before the final stretch. A good place is before the fight with the two Red Pyramid Things, giving you room to manipulate the ending conditions without replaying large sections of the game.
Finish the game once while preserving your Maria ending setup to unlock Vicious Circle. Then reload your late-game save and adjust your behavior to target the other two standard endings.
For Leave, repeatedly examine Mary’s Photo and Letter in your inventory and favor the actions that push James toward moving on.
For In Water, repeatedly examine Angela’s Knife and lean into the behaviors associated with that ending.
With careful save management, you can earn Maria, Leave, and In Water from the same first playthrough instead of replaying the entire game three times.
TROPHY CLEANUP AND EXTRA TIPS
Start New Game+ for the remaining ending trophies and challenge runs. This playthrough gives you access to the special items required for UFO, Dog, and Rebirth.
For UFO, collect the Blue Gem and use it in the required locations.
For Dog, find both halves of the Dog Key, combine them, and use it in the Observation Room at Lakeview Hotel.
For Rebirth, collect the four occult items: Crimson Ceremony, White Chrism, Obsidian Goblet, and Book of Lost Memories, then finish the game.
At Lakeview Hotel, make another manual save after solving the Music Box puzzle and obtaining the 3F Corridor Key, but before entering Room 312. This lets you reload and trigger multiple New Game+ endings without doing another full playthrough.
This second run is also the perfect time for Faster Than Fog, Radio Silence, and As Close as You Like. The 10-hour requirement is very forgiving once you know the route, so disable the radio as soon as you get it and avoid killing enemies with ranged weapons. New Game+ gives you the Chainsaw, which makes the melee-only requirement much easier and turns most enemies into a very short problem.
If you missed Archivist during the first run, it can still be completed in New Game+, so one forgotten memo does not automatically mean disaster. The main thing is to stay organized, keep strategic saves, and avoid turning Silent Hill into three extra full playthroughs just because James forgot to pick up one suspicious piece of paper.
Completion Video Playlist
1 video
Silent Hill 2 Remake Platinum Trophy Guide 00 / Preview